
Allergy check kit instructions
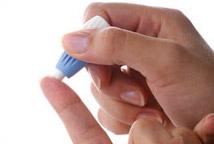
Prick Your Finger
Twist and remove the blue protective cover of the lancet (finger pricker). Place the white end against your fingertip and gently press down until it clicks.
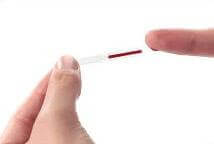
Collect Your Sample
Massage your finger towards the fingertip to form a droplet of blood. Place the collection tube onto the droplet and allow it to automatically fill up to the required mark.
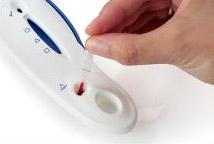
Transfer Your Sample
Place the tip of the collection tube into the smaller well on the testing unit marked by the blood drop symbol. The sample will automatically absorb into the pad.
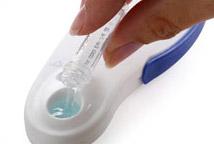
Add The Developer Solution
Remove the screw top of the solutions and pour into the larger unmarked well on the test unit. Wait 15 minutes.

Activate The Test Unit
After fifteen minutes, pull the blue slider completely out to activate the test unit. Wait a further 15 minutes.
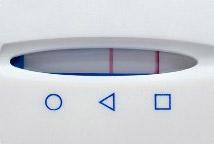
Read Your Results
After 15 minutes your results will be ready. Consult the ‘Instructions For Use’ included in your hallergy check kit to determine the status of your results.
Allergy Check Kits have been designed for people to use safely in the comfort of their own home. If your test results give you a positive result you may then either opt to determin the exact allergen by using our Allergy 35 home-to-lab test or consult a medical practicitioner.
Take the next step to relieving your symptoms.
Order your test today…

STEP 1.
Select the test to suit your own or family’s needs and order online.

STEP 2.
Look out for your order confirmation by email. Download your sample form.

STEP 3.
Complete the form and pop it in the post with a sample of hair.

STEP 4.
We’ll send you the results in a clear comprehensive four page report.
What happens after I receive my results?
Once you have received your report, the first step is to try eliminating the suggested catalysts from your diet.
We provide FREE support on:
Embarking and gaining progress on an elimination diet